Introduction
This guide covers how to deploy locally developed Web Panel, Admin Api and database to AWS services. There are so many services within AWS; we need to research what services are most ideal for us. Therefore, we seek answers to the following questions:
What are the solutions provided by the most frequently used services?
Which service should we use and why?
How to install apps on selected services?
Web Panel was developed with React
Admin Api was developed with Expressjs
PostgreSQL was used as the database
Note: This guide was written in June 2023.
AWS Service Investigations
Web Panel (React): Amplify
Admin API (Node - Express API): Elastic Beanstalk
Database (Postgresql): RDS
API Layer: Api Gateway
Viewing Logs: CloudWatch
Aws Amplify
AWS Amplify is a development platform that can be used to build, deploy, and manage web and mobile applications. It has a wide feature set that covers both frontend and backend services.
Amplify can be a good tool for rapid prototyping and deployment of web and mobile applications. Although it offers both backend and frontend support, it stands out more on the frontent side.
While it is a more suitable solution for Web Panel, it may not be a suitable solution for Admin Api.
Because connecting an API built with Amplify to a PostgreSQL database on Amazon RDS is usually done using an AWS Lambda function. In this case, the Lambda function receives API requests and forwards those requests to the PostgreSQL database.
EC2 (Elastic Cloud Computing)
EC2 enables hosting virtual servers in the AWS cloud. It can run Node.js application. It offers full control and customization capabilities. EC2 usually requires more management and maintenance. Ideal for complex applications that require customization and control.
Operating system installation, database, network and security preferences are made manually in EC2.

Elastic Beanstalk
No need to know about the infrastructure that runs the applications. It reduces management complexity without restricting choice or control.
It automatically takes care of capacity provisioning, load balancing, scaling, and application health monitoring.
It supports applications developed with Node.js and similar backends.
Provides one or more AWS resources, such as Amazon EC2 instances, to run the application.
Instead of setting up a virtual machine in EC2 and doing all the requirements manually, Beanstalk does not bother us with them. Elastic Beanstalk can be a good solution for Admin Api as it will automatically provide the resources for us.

What is AWS Elastic Beanstalk?
Getting started using Elastic Beanstalk
Deploying an Express application to Elastic Beanstalk
AWS Lambda
Lambda provides a serverless solution. Could it be a viable option for the Admin API?
Lambda highlights: Auto-scaling, event-based triggering, integration, and zero server management.
Lambda is for event-driven or demand-driven workloads. But Lambda has certain limitations.
For example, a Lambda function is allowed to run for a maximum of 15 minutes. Therefore, Lambda may not be suitable for longer running processes.
Besides that, Lambda has a 256 MB limit. It may not be a suitable solution for higher files.
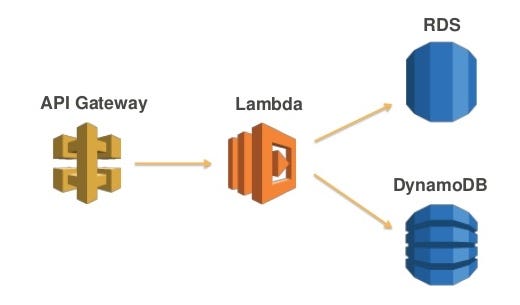
Lambda usage for Admin API:
1. In API Gateway, the Proxy Lambda feature redirects all requests made to a specific endpoint to Lambda.
2. Defined as a proxy, Lambda receives the request as it is, makes endpoint distributions and responds.
3. API gateway forwards the incoming response to the client application.
RDS (Relational Database Service)
RDS seems to be the best solution for Postgresql database at the moment.
Suppose we have installed the Admin Api project on the Beanstalk service. Postgresql Database installation can also be done from within Beanstalk, but this is not recommended. Because Beanstalk updates are made by AWS, there is a risk of data loss in the database with each update. Therefore, it is useful to keep the Postgresql database in a separate service, RDS.
Adding an Amazon RDS DB instance to your Node.js application environment
VPC (Virtual Private Cloud)
VPC service allows users to set up and manage their private virtual networks. Creates a secure and isolated region on the cloud platform with VPC. In this way, users can specify their own IP address range, subnets, firewall settings and traffic routing policies.
Below are descriptions of some VPC components.
Subnet: A block within the VPC with a specific IP address range. Each subnet resides within a geographically distributed Availability Zone (AZ) of the VPC. This ensures high availability and fault tolerance by distributing resources to different AZs.
Route Table: A table of rules that control the traffic flow of a VPC’s subnets. A Route Table can set policies such as allowing or denying an application on the subnet access to the internet.
Internet Gateway: It is a component that connects your VPC with the internet. A VPC without IGW will be completely isolated and will not communicate with the outside world.
NAT Gateway: Allows resources in private subnets to securely communicate with the internet. NAT Gateway routes incoming requests through a single IP address, thus preventing private IP addresses from being directly exposed to the internet.
Network Access Control List: An extra layer of security applied to subnets in your VPC. It controls traffic to and from specific IP address ranges.
Security Group: A private EC2 instance on your VPC or a firewall applied to other resources. It controls traffic from or to specific IP addresses.
SSM (Systems Manager)
Systems Manager manages, monitors, and secures resources in the AWS environment, providing management from one place. This helps you improve the operational effectiveness, security, and compliance of your workloads on AWS.
The part that interests us right now is the Parameter Store, which is located in the Application Management area.
Parameter Store; It provides a central repository for managing your configuration data, whether plain text such as database strings or secrets such as passwords. This allows you to separate your secrets and configuration data from your code. Parameters can be labeled and organized into hierarchies, which helps you manage parameters more easily. For example, you can use the same parameter name “db-string” with a different hierarchical path “dev/db-string” or “prod/db-string” to store different values. Systems Manager is integrated with AWS Key Management Service (KMS) and allows you to automatically encrypt the data you store. You can also control user and resource access to parameters using AWS IAM.
AWS Cognito
AWS Cognito is a service that provides user management, authentication, and authorization. It meets the user authentication needs of mobile and web applications in a secure, scalable and flexible manner.
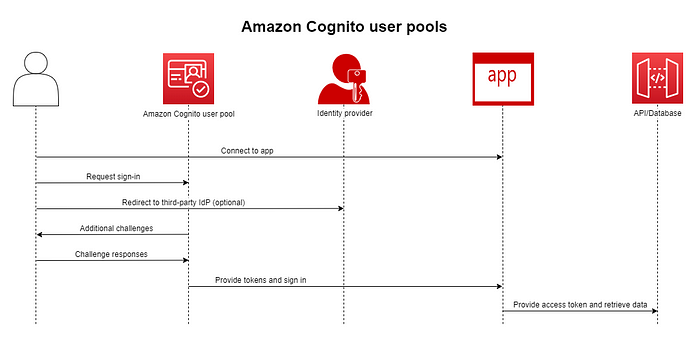
User Pools: Allows users to register, log in, and manage profile information. User pools allow developers to easily and securely manage users. It also allows users to register themselves directly by email or phone number or sign in via third-party identity providers.
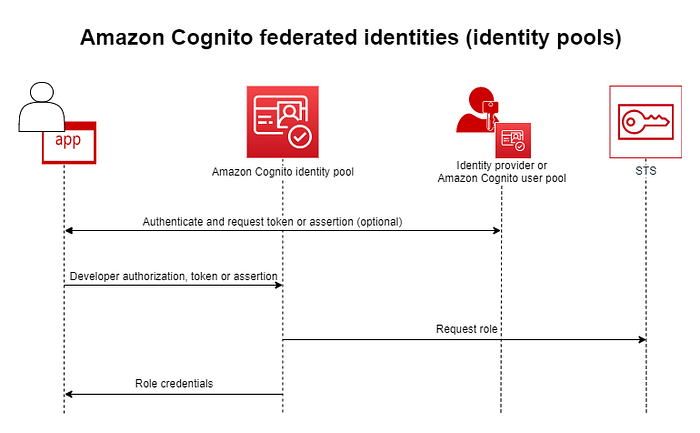
Identity Pools: Grant specific permissions to AWS services to authenticated or unauthenticated users. Identity pools help you authorize users’ access to other AWS services. For example, the user can be granted access to an Amazon S3 bucket or trigger the AWS Lambda function.
AWS Architecture Diagram
Here is a schematic image showing the interrelation of services.

Deploy Process Roadmap
In cloud architecture; Amplify service for Web Panel, Beanstalk service for Admin Api and RDS service for PostgreSQL database were determined. Beanstalk and RDS services are private, so there will be no direct access from the internet. The Amplify service will be open to everyone.
API gateway was selected to access the Admin Api in Beanstalk from the Web Panel in Amplify.
Now, let’s explain from the beginning how the deploy process is done in order to be successful.
1- Cognito Setup for Admin Login
Cognito User Pool is required to login to Web Panel. This step will explain how to create User Pool and Identity Pool.
Open Cognito from the AWS Admin Console, click the “Create user pool” button.
- Configure sign-in experience
1. Provider types: Cognito User Pool
2. Cognito user pool sign-in options: email - Configure security requirements
1. Password policy mode: Cognito defaults
2. MFA enforcement: No MFA
No need for MFA in test environment.
3. Self-service account recovery: Mark
4. Delivery method for user account recovery messages: email only - Configure sign-up experience
1. There is no need to make changes in this step. - Configure message delivery
1. Email provider: Send email with Cognito - Integrate your app
1. User pool name: web-panel-user-pool-21june
2. App type: Public client
3. App client name: web-panel-app-client-21june - Review and create
6.1. After checking all the steps, click the “Create user pool” button.
Open Cognito from the AWS Admin Console, click the “Identity pools”.
- Click the “Create new identity pool” button.
- Identity pool name: web-panel-idp-21june
- Authentication flow settings: It can be “Allow Basic (Classic) Flow” for the test environment.
- Authentication providers
- Choose Cognito
- User Pool ID: This information is in the Cognito User Pool.
- App client id: This information is in the Cognito User Pool.
- Click the “Create pool” button.
- Click the “Allow” button.
After creating a Cognito user, a phone confirmation message is sent to log in to the Web Panel with this account. In order for this message to reach the relevant phone number, the phone number must be added to the virtual environment.
- Go to the SNS service from the AWS Admin Console.
- Click the “Text Messaging” tab.
- Click the “Add phone number” button.
- Write down the phone number and save it.
It is necessary to assign a new permission to the Cognito Auth role.
- Go to IAM service, click Policies tab.
- Click the Create policy button.
- Type “Api Gateway” in the Search field and select it.
- Select “All API Gateway actions” (for now).
- Click the JSON tab and change the Action and Resource information:
"Action": [
  "execute-api:",
  "execute-api:Invoke"
],
"Resource": ""
6. Click the Next button.
7. An example name for the Policy name field: Web_Panel_ApiGW_Invoke_Policy_21june
8. Click the Create policy button.
9. Open Cognito…Auth_Role from the Roles tab.
10. Click “Add permissions” button and select Web_Panel_ApiGW_Invoke_Policy_21june permission and save it.
2- Web Panel Configuration and Amplify Setup
React app can be installed on Amplify service via GIT providers or a zip file. When we connect the Web Panel application in the Bitbucket repository directly to the Amplify service, no additional settings will be required. The installation steps here are for installation via zip file!
First of all, we will configure Cognito for authentication in Web Panel.
1. In order to log into the application from the Web Panel, we need to add some configuration information in Cognito to the Web Panel. This information is available in the AWS Cognito console. Information to be filled in env file in Web Panel:
REACT_APP_COGNITO_ADMIN_USER_POOL_ID=
REACT_APP_COGNITO_ADMIN_REGION=
REACT_APP_COGNITO_ADMIN_IDENTITY_POOL_ID=
REACT_APP_COGNITO_ADMIN_IDENTITY_POOL_REGION=
REACT_APP_COGNITO_ADMIN_USER_POOL_WEB_CLIENT_ID=
2. The idToken is sent from the Web Panel to the Admin Api in every request. We will add Cognito information to Admin Api so that idToken mapping can be successful.
2.1. Click the Parameter Store tab from the SSM service.
2.2. Click the “Create parameter” button.
2.3. Enter “/Dev/AdminApi/Cognito-Admin-Keys/22june” as an example in the Name field.
2.4. In the Description field, write “COGNITO_ADMIN_USER_POOL_ID, COGNITO_ADMIN_REGION” as an example.
2.5. Select the type “SecureString”.
2.6. Add UserPoolId and Region information to the Value field by separating them with commas.
2.7. Click the Create parameter button.
2.8. Now open utils/ssmUtils.js file in Admin Api project.
2.9. Write the created parameter name in the Names and case fields. 👇
const params = {
  Names: [
     ...
     "/Dev/AdminApi/Cognito-Admin-Keys/22june",
     ...
  ],
  WithDecryption: true
};
...
case '/Dev/AdminApi/Cognito-Admin-Keys/22june': {
  const cognitoAdminKeys = param.Value.split(',');
  serverDevParams['COGNITO_ADMIN_USER_POOL_ID'] = cognitoAdminKeys[0];
  serverDevParams['COGNITO_ADMIN_REGION'] = cognitoAdminKeys[1];
  break;
}
...
3.
3.1. Run npm run build command in Web Panel application.
3.2. Compress inside the build file, not the build file.
3.3. Upload the compressed file to the Amplify service.
3.4. Set Rewrites and redirects from the Amplify panel. 👇 AWS documentation source
Source address: </^[^.]+$|\.(?!(css|gif|ico|jpg|js|png|txt|svg|woff|woff2|ttf|map|json|webp)$)([^.]+$)/>
Target address: /index.html
Type: 200 (Rewrite)
Country code: -
3- Admin API (Elastic Beanstalk)
An application can be uploaded to the Beanstalk service as a zip file, added via S3 service or GIT providers. When you go to the Beanstalk service from the AWS management console, a new environment is created first.
Note: During the installation, “Info” is written at each step. If you click on it, you can read more detailed explanations.
Step 1: Configure environment
Environment tier
Environment tier selection: Web server environment
Application name: admin-api-9june
Environment name: Admin-api-9june-env
Platform
Platform: Nodejs
Platform branch: Node.js 16 running on 64bit Amazon Linux 2
Platform version: 5.8.2
Application code
If Git provider is to be used, Sample Application is selected.
In the other two options, S3 or Local file, the file must be in zip format.
No need to add the node_modules file.
Step 2: Configure service access
Service access
At this stage, the Service role and EC2 instance profile selections should be made correctly.
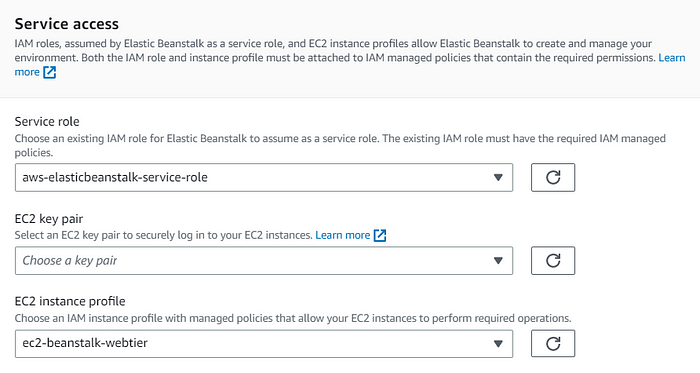
These roles must be created from the IAM service.
Permissions required for aws-elasticbeanstalk-service-role: AWSElasticBeanstalkEnhancedHealth, AWSElasticBeanstalkService
Permissions required for ec2-beanstalk-webtier: AWSElasticBeanstalkWebTier, AdministratorAccess-AWSElasticBeanstalk
Step 3: Set up networking, database, and tags
Virtual Private Cloud (VPC)
In the VPC part, we will create a unique VPC for our applications.
- Click on “Create Custom VPC”.
- Click the “Create VPC” button in the VPC service.
- In the Resources to create section, we select the “VPC and More” option. Because VPC components are ready for us.
- In the “Name tag auto-generation” field, type the VPC name.
- Here, in addition to the default selections, we create 1 NAT Gateways. Because our services will be on private subnets, we do not want external access to the services. We open access to outside with NAT Gateway.
- That’s it, finish the VPC installation, continue with the Beanstalk installation.
- Select the VPC you created.
Instance settings
Public IP address will be false.
Select private subnets for Instance subnets.
Database
Check enable database.
Snapshot: none
Configure the database settings. After selecting the engine, the engine version may not appear immediately, a problem may occur in the interface.
Select private subnets within database subnets.
Step 4: Configure instance traffic and scaling
Instances
You don’t need to select Security Group for EC2 in Instances section, Beanstalk creates it automatically.
Step 5: Configure updates, monitoring, and logging
Monitoring
To see the logs, enable the Log Streaming option here.
Platform Software
Also enable the Log Streaming option here.
Last Step: Review
Make the checks on the last page and finish the installation.
4- API Gateway
We will create an Api Gateway to access the Admin Api from the Web Panel. We cannot access the Beanstalk domain directly. So we will first access the VPC that the Beanstalk service is connected to.
1.1. On the Api Gateway page, click the “VPC Links” tab and click the Create button.
1.2. Choose a VPC link version: VPC link for REST APIs
1.3.1. After entering the name in the VPC Link details, we need to select Target NLB. Now we need to create a Network Load Balancer.
1.3.2. Open EC2 service from AWS management console.
1.3.3. Click in order: Load Balancers -> Create Load Balancer -> Network Load Balancer

1.3.4. Enter a name such as “test-api-nlb” in the Load Balancer Name field.
1.3.5. Select Internal from Scheme.
1.3.6. Select IPv4 from IP address type.
1.3.7. Select the VPC you created in the network peering section and tick private subnets.
1.3.8. In the Listeners and routing field, protocol will be TCP and Port will be 80.
1.4.1. Then click the Create target group button.
1.4.2. Enter a name such as “test-api-tg” in the Target group name field.
1.4.3. The only place to change when creating a Target Group is the Health checks section. Select TCP from Health check protocol, click Next.
1.4.4. Check the Instance that appears in the Register targets section and click the Create Target Group button. It may take some time to create the target group.
1.5.1. Now switch to the Network Load Balancer you are creating. Select the Target Group you created in the “Default action” section.
1.5.2. Click the Create Load Balancer button. It may take some time for the Load Balancer to form.
2.1. Now go back to Create a VPC link area in Api Gateway service.
2.2. After specifying the name here, select the Network Load Balancer you created.
2.3. Click the Create button.
3.1.1. Switch to the “APIs” section from the left panel, click the Create API button.
3.1.2. Choose “REST API” as API type.
3.1.3. Choose the protocol: REST
3.1.4. Create new API: new API
3.2.1. Settings-> Api Name: test-api
3.2.2. Settings-> Endpoint Type: Regional
3.2.3. Click the Create API button.
3.3. Enter the API you created. Select Create Resource from the Actions section, write the information, click the Create Resource button.
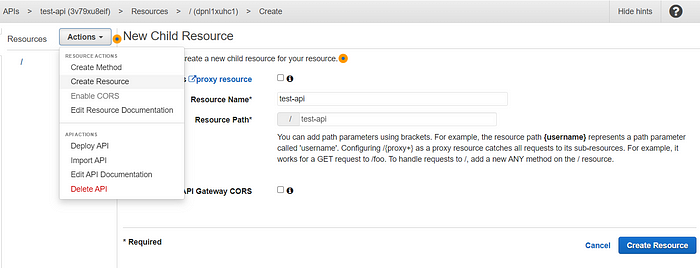
3.4. Click on the resource you created and create a new resource, enter the information as in the image and click the Create Resource button.

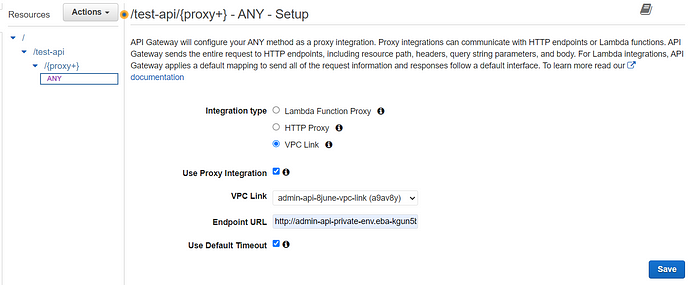
3.5.1. Click the generated Any method. Fill in the information as in the image below.
3.5.2. The VPC Link part is the NLB link you created.
3.5.3. A Beanstalk link will appear in the Endpoint URL field. Beanstalk link will have “http://” at the beginning and /{proxy} at the end.
3.5.4. Then click Deploy Api from the Actions section.
3.5.5. Here we add the generated resource name to the end of the Invoke URL address. We use this link in React project.
5 — Web Panel, Admin Api Configurations and Viewing Logs
We will make some simple configurations in Web Panel and Admin Api files. We will pull data from SSM — Parameter Store for Cognito and RDS connection in Admin Api application.
1.1. Open the Web Panel project.
1.2. We got Invoke URL from API Gateway service.
In Web Panel go to src -> api -> utils -> Constants -> apiConstants.js.
Enter this address into BASE_URL_REMOTE,
Type "resource name" in API_GATEWAY_RESOURCE_NAME.
1.3. That’s it, now you have to deploy the Web Panel application to the Amplify service again. These steps are explained in the 2nd row under the “Web Panel Configuration and Amplify Setup” heading.
2.1. Open the SSM service from the AWS Management Console, then click the Parameter Store tab.
2.2. For Postgres we will add username, password, address, dbname, port information. The host (address), dbname and port information can be seen from the RDS service, username and password are the information you enter in the database section in the Beanstalk installation.
We will add UserPoolId and Region information for Cognito. You can find this information in the Cognito console.
2.3. There are different types of data retention in the Parameter Store, we will use the stringList property.
2.3.1. for Postgres
2.3.1.1. Click the “Create Parameter” button.
2.3.1.2. /Dev/AdminApi/Database/PostgresInfo/13june in the Name field.
2.3.1.3. SecureString in the Type field.
2.3.1.4. In the Value field, write the host, username, password, database and port information, separated by commas, without spaces.
2.3.1.5. Click the “Create parameter” button.
2.3.2. for Cognito
2.3.2.1. Click the “Create Parameter” button.
2.3.2.2. /Dev/AdminApi/Cognito-Admin-Keys/19june in the Name field.
2.3.2.3. SecureString in the Type field.
2.3.2.4. In the Value field, write the UserPoolId and Region information, separated by commas, without spaces.
2.3.2.5. Click the “Create parameter” button.
3.1. We will access the information here from the Admin Api with the aws-sdk library. Now go to IAM service, click Users tab and create a user named SSM.readOnly.
3.2. Select “Attach policies directly” in Permissions options.
3.3. Select “AmazonSSMReadOnlyAccess” in the Permissions policies field.
3.4. Click on Create User.
3.5. Click on the SSM.readOnly User you created.
3.6. Click the “Create Access Key” button in the Security Credentials area.
3.7. Select the “Local Code” option and click the Next button.
3.8. After entering the description here, click the Create Access Key button.
3.9. You are now in the Retrieve access keys section. Store the Access key and Secret access key information, download the .csv file and click the Done button.
4.1. Now open the Admin Api application.
4.2. Save the access key, secret access key and region information in the .env file.
4.3. Create awsSSMConfig.js file in the config folder. It will be like below! 👇
//awsSSMConfig.js

import AWS from 'aws-sdk';
import dotenv from 'dotenv';

dotenv.config();

function awsSSMConfig() {
    AWS.config.update({
        region: process.env.SSM_REGION,
        credentials: {
            accessKeyId: process.env.SSM_ACCESS_KEY_ID,
            secretAccessKey: process.env.SSM_SECRET_ACCESS_KEY,
        },
    });
}
export default awsSSMConfig;
4.4. Create file named ssmUtils.js in utils folder. We will add the awsSSMConfig function here, we will access the SSM service and get the information.
...
response.Parameters.forEach(param => {
switch(param.Name) {
    case '/Dev/AdminApi/Database/PostgresInfo/13june': {
        const postgresInfo = param.Value.split(',');
    serverDevParams['host'] = postgresInfo[0];
        serverDevParams['username'] = postgresInfo[1];
        serverDevParams['password'] = postgresInfo[2];
        serverDevParams['database'] = postgresInfo[3];
        serverDevParams['port'] = postgresInfo[4];
        break;
    }
    case '/Dev/AdminApi/Cognito-Admin-Keys/19june': {
        const cognitoAdminKeys = param.Value.split(',');
        serverDevParams['COGNITO_ADMIN_USER_POOL_ID'] = cognitoAdminKeys[0];
        serverDevParams['COGNITO_ADMIN_REGION'] = cognitoAdminKeys[1];
        break;
    }
...
4.5. Zip the Admin Api project again and redeploy it to the Beanstalk service.
4.6. Now go to Amplify link and test it. All services will work if the installations are done successfully.
4.7.1. While doing the installations, we also activated the log view. To view the Beanstalk logs, enter the environment in the service: Logs -> Request logs -> Last 100 lines
4.7.2. In addition, Logs can be followed from Log Groups in CloudWatch service.
5. Check it:
1. Open the Target Group you created from the EC2 service.
2. Check the “Registered targets” field or click the “Register target” button.
3. Select in the “Available instances” field.
4. Click the “Include as pending below” button.
5. Finally, click the “Register pending target” button.
Conclusion
Deploying web applications, databases or APIs to AWS can be a complex process, but following the right steps can ensure a smooth and efficient deployment. This guide walks you through the deployment process, from setting up the environment to configuring services such as VPC, Amplify, Elastic Beanstalk, and RDS. By following these instructions carefully, you can ensure a robust deployment that leverages AWS’s powerful tools for scalability, security, and performance.
Remember, AWS offers a wide range of services to meet a variety of needs, and while it may seem overwhelming at first, taking the time to understand each component will pay off in the long run. For me, managing the deployment process to AWS from start to finish was very exciting. Because for the first time I was comfortable using the services in AWS, doing research and developing applications.
Anyway, as long as the AWS interface remains unchanged, this article will be generally valid, but at least you have a good overview of many services. I hope it will be useful.
Happy deployment!
