Hello everyone! 🙌 I hope you are well. I wanted to share this topic with you because I found it very useful.
Before starting, it is necessary to ask the following questions:
- How do I know where the errors in my application are coming from?
- Do I ask for a screenshot when a user encounters an error in my application?
- I know I shouldn’t write error messages to the console, but what do I do instead?
Well, yes, I need a logging service. - Do I build this log service from scratch?
- How can I choose between error logging services?
- …
If you’re asking these questions, you’ve come to the right place. ✨
In my case, I needed a logging service for my Nextjs project. So first I searched which service works better with Nextjs (App Router).
Then I found that Sentry and Rollbar services work better. You can see in the comparison table below. Sentry was ahead for me by a few points and that’s why I chose Sentry.
Error Logging and Monitoring Platform Comparison

Prerequisites
I use Nextjs App Router.
I will make these installations through the nextjs-supabase-todo-app project that I share publicly on Github:
If you have a Nextjs project, you can do similar steps by following the installations.
Sentry Setup
1- Firstly, create account in Sentry
2- Click to ”Create Project” button
3- Choice Nextjs
4- Specify the project name and click the ”Create Project” button
5- You must be “Configure Next.js SDK“ page
6- Copy this command npx @sentry/wizard@latest -i nextjs
7- Turn to the nextjs project
8- Open your project terminal and running this command
Sentry Wizard is up and running, doing all the setup for us. You’ll get a few questions here. Here are my answers:
9.1- Are you using Sentry SaaS or self-hosted Sentry? -Sentry SaaS (sentry.io)
9.2- Do you already have a Sentry account? -Yes
9.3- Sentry browser configure…
9.4- Select your Sentry project. -nextjs-2v/javascript-nextjs
9.5- Uploaded files:
- Installed @sentry/nextjs@7.105.0 with NPM.
- Created fresh sentry.server.config.ts.
- Created fresh sentry.client.config.ts.
- Created fresh sentry.edge.config.ts.
- Added Sentry configuration to next.config.js. (you probably want to clean this up a bit!)
- Created app/global-error.jsx.
9.6- Do you want to create an example page (“/sentry-example-page”) to test your Sentry setup? -Yes
9.7- Uploaded files:
- Created app/sentry-example-page/page.jsx.
- Created app/api/sentry-example-api/route.js.
- Added auth token to .sentryclirc for you to test uploading source maps locally.
- Created .sentryclirc.
- Added .sentryclirc to .gitignore.
9.8- Are you using a CI/CD tool to build and deploy your application? -Yes
9.9- Copy the SENTRY_AUTH_TOKEN and pasted env file
9.10- Did you configure CI as shown above? -I’ll do it later…
For example, if you keep your project in Vercel, select the other option and connect your application to Sentry.
And… You can validate your setup by restarting your dev environment (next dev) and visiting “/sentry-example-page”
🎉 Successfully set up Sentry for your project 🎉
Let’s see what Sentry has added to our project:
Example client page: /app/sentry-example-page/page.jsx
Example route: api/sentry-example-api/route.js
Global error file: /app/global-error.jsx
Sentry package: “@sentry/nextjs”: “7.109.0”
Config files: sentry.client.config.ts, sentry.edge.config.ts, sentry.server.config.ts
Test
Running the project and go to the /sentry-example-page route.

Click throw error and open the Sentry panel. Open the Issues page. We have two issues.
Note: Error names can be customised.

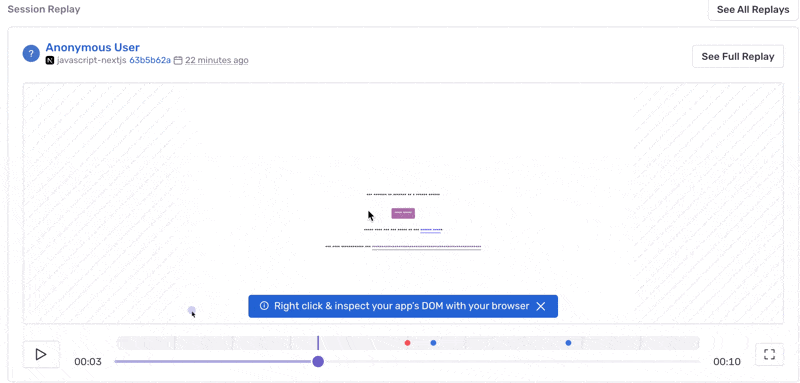
You can click on the error and start analysing. There are many properties on this page; browser, device, url, environment, error level etc. at the top. My two favourite features on this page are Session Replay and Breadcrumbs.
With Session Replay, you can see where you clicked in the UI and how the error message was received.
Breadcrumbs lists the events until the error occurs.

Customising Errors
In my project, two functions will be enough for now. I can send supabase errors with supabaseReportException and error messages with reportLog.
// utils/sentry/reportExeptions.ts

import * as Sentry from '@sentry/nextjs';
import { SeverityLevel } from '@sentry/nextjs';
import { PostgrestError } from '@supabase/supabase-js';

export const supabaseReportException = (error: PostgrestError) => {
    const errorDetails = JSON.stringify({
        code: error.code,
        details: error.details,
        hint: error.hint,
        message: error.message,
    });
    Sentry.captureException(new Error(`Supabase Error: ${errorDetails}`));
};

// type SeverityLevel = "fatal" | "error" | "warning" | "log" | "info" | "debug"
export const reportLog = (errorMessage: string, errorLevel: SeverityLevel) => {
    Sentry.captureMessage(errorMessage, errorLevel);
};
Usage 👇

Conclusion
I explained how to integrate Sentry into a Nextjs project and where and how to use error messages.
From here on, it’s up to you. You can find more details in the Sentry documentation. Take full control of the errors!
See you in the next article!
